Here SMT Srl – the independent Italian testing laboratory and mechanical workshop – focuses on the requirements for impact tests at low temperatures, as well as the importance of factoring in transition temperature.
Some fastener standards require impact tests and often at low temperatures. For example, Class 8.8 and 10.9 of the EN ISO 898-1 standard must be tested at -20°C, while in the case of Grade L7 of the American standard ASTM A193 at -101 °C.
The reasons why the tests are carried out at temperatures below zero is essentially linked to the fact that fasteners often work at low temperatures and therefore it is necessary to verify they maintain good impact test values even at temperatures below zero.
However, there is another factor that should be considered, verifiable with the impact test, and it is the transition temperature. The steels with a crystalline structure, with a body centered cubic (all steels with the exception of austenitic stainless steels) falling below a certain temperature, change behaviour – passing from ductile to brittle. This step can be gradual or sudden, with a small drop in temperature making the steel significantly brittle.
Conventionally it has been established that the transition temperature is that temperature value in which the fracture surface is 50% brittle and 50% ductile. To calculate this value, it is therefore not sufficient to evaluate the absorbed energy value (the value in Joules) but to verify the appearance of the fracture following the impact test.
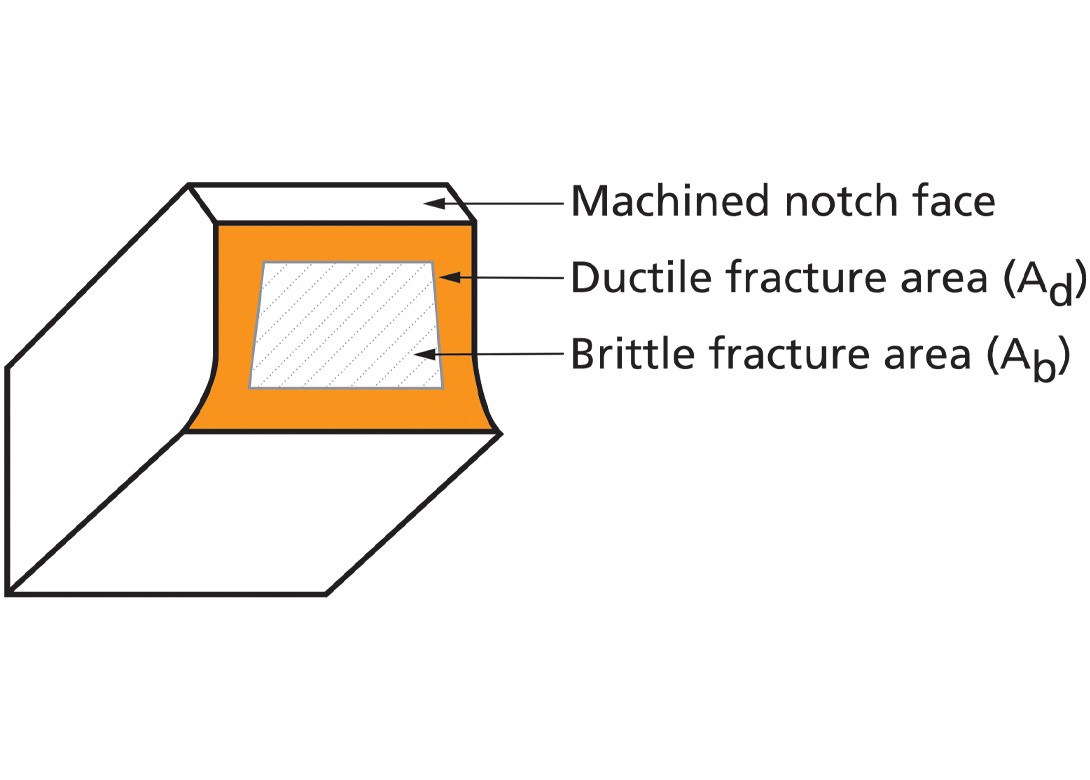
If the fracture surface has a smooth appearance, it indicates that it is brittle, if it appears fibrous it indicates that it is ductile. In the case of a Charpy specimen, the brittle part will be in the centre of the specimen –
while the ductile part will be near the edge. To correctly calculate the percentage of brittle fracture it is necessary to have a calliper and measure the two sides of the brittle area and calculate the area (Ab). This value must then be divided by the area of the section of a Charpy specimen, which in the case of a KV is equal to 80mm2 and multiply it by 100.
To find the transition temperature it is necessary to perform a series of triples of KV at different temperatures and report the brittle percentage on the ordinate axis and the test temperatures on the abscissa. The intercept between the straight line passing through 50% of the brittle fracture, and the curve obtained by interpolating the points obtained from the tests performed at different temperatures, defines the transition temperature. It is then possible to obtain two other data: The intercept between the line passing through the 100% brittle fracture defines the ‘Nil Ductility Temperature’, while the intercept between the line passing through the 0% brittle fracture determines the ‘Ductility Transition Temperature’ (Figure Two).
Verifying the value of energy absorbed by an impact test is relatively simple because it is a value that is calculated directly by the test pendulum. The calculation of the brittle percentage of a fracture is instead performed by the operator, who necessarily must be an expert. Thanks to the high number of FATT performed daily, and the experience of its staff, the SMT laboratory is able to ensure considerable accuracy in this type of calculation and guarantee its customers the correct achievement of the transition temperature.
www.smtsrl.com/index.php/it

Biog
Will joined Fastener + Fixing Magazine in 2007 and over the last 15 years has experienced every facet of the fastener sector - interviewing key figures within the industry and visiting leading companies and exhibitions around the globe.
Will manages the content strategy across all platforms and is the guardian for the high editorial standards that the Magazine is renowned.


